4.08.2015

Doors are in!


In the morning they were leaning in the future places.

In the afternoon they were all in!


4.07.2015

How I assembled the laundry cabinets

About 3 weeks ago, I knew it was time to get serious about the cabinets. From day one, I knew we would be using IKEA cabinets in the laundry room. For one, you can't beat the price, anywhere. And two, the look is clean and simple. And three, I was able to get my long, deep drawers which are by far a better choice for storage that shelves with doors, in my opinion. I knew the style, the design and that it all measured 24" deep. Standard depth, no other option.

Then I measured. And I measured again.

And I looked at the plans. And yes indeed, the cabinets were drawn at 18". Which means the door to the powder room was built to allow an 18" deep cabinet, not a 24" one.

So I stressed myself out, looked at other options, thought about just ordering something cheap from Home Depot that would still cost over $1500 and then I just ended up back where I had started: I wanted the IKEA cabinets.

Solution: make the door frame smaller to the powder room and order a new door.

And so we did. Actually John did. And I went shopping.

I came home with a crazy amount of boxes, all of which are not shown below, and knew that I had some solid hours of assembly ahead of me. I could have had John assemble them, but when you pay your contractor his hourly rate of $65 to assemble IKEA cabinets then your IKEA cabinets are not really that inexpensive anymore. And besides, I like the assembly part. I know a lot of people loath Ikea furniture for that reason. I'm a little strange. I get a huge amount of satisfaction when I have indeed completed the task.

My husband took care of the boys and I headed over to a dark and empty house with a flashlight and set of tools. The guys had left one of their work lights on for me and I found a good Pandora station and got to work.

At 7:35PM it looked like this:

At 9:05PM, it was all done:

And by the end of the next day, it looked like this:


PS Those are the floors tiles. I love them!

PSS The old laundry door is not wasted by the way nor a major cash loss. It's put aside and will be the door we use for the storage space in Phase 2. I like it when things turn out that way.


4.06.2015

Trim tools

Trim tools are big. And need lots of space. Luckily, we had some of that.

And then there is the "throw everything else in it" room. High fixtures, vanities, hardware, oh my. It just keeps arriving and right now we have quite a stockpile.

A week from today, this room may just look totally different.


3.30.2015

Waiting for the tapers to finish

Sheetrock is a mess. There is silica dust everywhere. And the tape and glue and white goopy stuff that they use to seal it all up is a mess. And because everything is a mess and the tapers are basically in every corner of every room, everything else is stopped or at least on hold. 

What is not on hold is making decisions. In comes my gratitude for our contractor and his organization and forward thinking. Last Monday, exactly a week ago knowing the delay with our taping crew, he gave me a list and said to have all of this ready by Monday March 30th. On the list: tile, cabinets, railings, confirm painter.

So last week, I ordered the shower wall tile on Tuesday, picked out and loaded the laundry cabinets from IKEA on Tuesday, realized the countertop we had chosen for the laundry doesn't work with the floor tile so added that decision back onto the to do list on Tuesday, looked at new options for countertops on Wednesday, approved the railing design on Wednesday, ordered the undercount laundry sink on Wednesday, verified the floor tile layout on Thursday, confirmed the painter on Friday, picked up the shower wall tile on Friday and then unloaded it all into the garage. Yup, that about covers it.

But today it's Monday, March 30th and I think we're still waiting for the tapers to finish and our new expedited, updated and exciting construction schedule is delayed by 2 days. Installing cabinets and shower pans and starting on interior trim will have to wait. 

New date to get this show on the road: Wednesday April 1st.

Stay tuned.


3.19.2015

Tapers are here!

There is a light at the end of the tunnel. And that light started at 8am this morning when a gaggle of guys arrived with crazy looking Star Wars like stilts and wet goopy paste that is appearing like goose poop all over everything.

But they are here and they aren't 10 days delayed and they are taping it at all up! This is progress people!


3.14.2015

Sheetrock Day One!


First came the pink stuff.

Then came 100+ sheets of heavy sheetrock that had to be carried up our stairs.

Then came the guys on stilts.

Seriously, this is crazy.

What is even crazier - we are starting to see exactly what this house is going to feel like.


3.12.2015

Big triumphs!

It was big week.

Fire Inspection - Passed!

Close in Inspection - Passed!

Next up sheet rockers!

Here it goes!!!!

2.26.2015

Small triumphs

We've had a time set back this week. And in the final stretch, that feels miserable.

So I am choosing instead to dwell on the development of yesterday. Which is that in the morning the exterior of our house looked like...


And when I can home at 4pm it looked like...

It's not going to be white but I LOVE it already! Really, I am almost giddy.

2.19.2015

Perspective

I spent last weekend with two of my favorite women on the whole planet. We do this every year and have been since we graduated college. And inevitably, some little nugget of wisdom seeps through the laughter and spa treatments and parenting story telling. It's the little nugget that stays with me even days later as I toss and turn it around in my head.

It is basically this: Stressing over choosing Faucet A or Faucet B vs. figuring out how to pay for your child's college with your husband's divorce lawyer.

Well, that basically says it all.

I have posted before on how to keep perspective and not get caught up in the zany, stressful, taxing and often time sensitive and money draining world of construction. I don't know how to be chill and not take it seriously. You have to take it seriously so that you make smart decisions, prioritize the necessities and not squander your money. And let me tell you - do you know how easy it is to squander money on a construction project? Easy, so easy, too easy. You basically just have to open your mouth and you have already squandered $1000. Miscommunications, missed decisions, mistakes. Money, money, money.

And the money part is what makes it really hard for me to keep perspective. When it comes down to it, it's that plus a bit of twisted perfectionism that makes me not want to do anything wrong or make an mistakes or piss anyone off. So this is where my work must start - somewhere in all of this lies my inability to really truly keep my cool and trust that all is happening the way it is supposed to. And to not sweat the small stuff.

I warned you that this blog wasn't going to be just about nails, upholstery and 2x4's.

1.31.2015

$72/sq foot!!!!!!!!

I thought I had done it: checked off one item on my to-do list. Find shower floor tile. Check.

Until, I get a sweet little email from I think a really nice lady telling me that this mosaic tile is $72/sq foot. Seriously. $72/sq foot. I almost fell of my chair.

The crazy part is that I saw this on the counter in a showroom and it had belonged to the previous client. One was labeled boy's shower and the other girl's shower. Hello megamillion dollar house in Marin.

I think I'll head to Lowe's…or at least the internet and see what this resourceful clever girl can find for about $10/sq foot.


1.28.2015

It's the little tasks...

Yes, we have a a great architect.

Yes, we have great contractor.

One charges $150/hr and the other charges $65/hr.

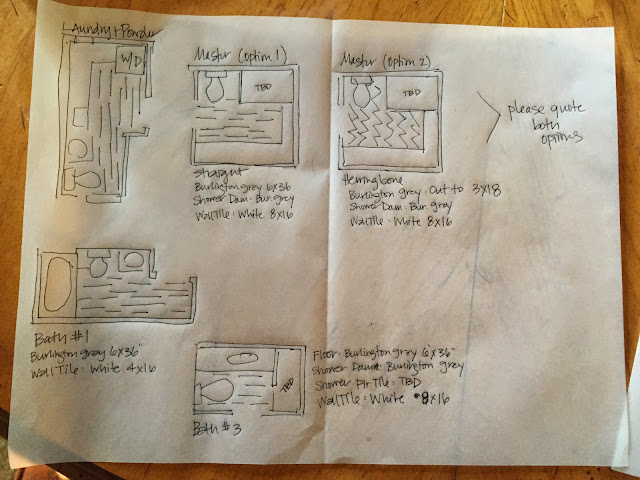
So when the tiler needs to know floor tile direction in order to create a proper proposal,  instead of passing this 30-40 min task onto someone who is going to bill me for it, I do it.

Cute little drawings, huh?


1.19.2015

Lighting. F'ing lighting.

It just got stressful. Or tense. Or something uncomfortable that I can't really describe. It actually started last week when we opened the electrical can of worms. And as you can see from the electrical page of our plans, it's pink worms to be exact.


Lighting. It's getting the better of me.

I know it matters but I don't totally understand the implications. I know what I don't like. And I know that I really dislike bad lighting.  But what makes bad lighting? And what makes good lighting? And what makes energy efficient lighting? And I get why most people pay a professional for this kind of thing!

It feels important and expensive. And if you make a mistake there is paint and drywall and all kinds of stuff that you have to get through to fix it. So the pressure is on getting it right and getting it right now, not later.

So there you have it.

And over the weekend, while Uncle Robin again entertained our children, we walked and talked lighting and came up with this outrageously comprehensive addendum to our lighting plan:

LIVING ROOM (ALL NOT INCLUDED IN ORIGINAL SCOPE)

ADD: 8 LED cans in 2 rows as discussed with John
LOCATION: First row of cans should be in the second bay from the right if you're looking towards the mountain right
DISCUSS: Center row of cans with wide angle light dispersion and row of cans close the stairs spotlight set up
ADD: Track light 18-24" from left wall
ADD: Cans to be on the same switch the and the track light to be on its own switch, switch located at corner in dining room
ADD: For Phase 2 hallway to the bedrooms, add 1 cans centered in "hallway" and one can in the small little hallway
ADD: For Phase 2 stair, add 2 cans centered on future landing (get placement and dimensions of landing - layout TBD)
VERIFY: Existing ceiling light in entry stays the same as does switch
VERIFY: Raise the existing/new outlets to accommodate future raised floor in entry
VERIFY: Switch locations

POWDER ROOM

CHANGE: Fan/Light combo to Fan only, no light
CHANGE: Move fan to the corner above toilet
ADD: beauty plate in the center of the room for a ceiling fixture
ADD: Ceiling fixture to same switch as vanity light (ADDITION TO SCOPE)
VERIFY: Outlet location next to light switch
A/P: Choose vanity light fixture (TBD)
A/P: Choose ceiling light fixture (TBD)
LAUNDRY ROOM
ADD: Track light running parallel to long countertop/cabinet (ADDITION TO SCOPE)
Place track near double joist in the ceiling or at the end of the second bay if you are looking towards the mountain
CHANGE: Only 1 LED can instead of 2, centered in doorway (CHANGE TO SCOPE)
VERIFY: Location of switch for 1 Can and 1 track light on wall behind barn door
VERIFY: outlet under window and near sink
A/P: Choose track/lights (TBD)
PANTRY

A/P: Choose light fixture (TBD)
ADD: Box with cover for exposed wire for under shelf wire (ADDITION TO SCOPE)
CHANGE: Framing for duct to give one more shelf in pantry
ADD: Water source to outside for hose

DINING ROOM  - ONLY 6 CANS/Ceiling fixture INCLUDED IN SCOPE

ADD: Wiring for 60 inch track light in ceiling at sub panel wall about 18 inches away from wall
ADD: Wiring for 60 inch track light in front of the wall with barn door
ADD: track light that starts at the left side of the laundry door, in line with the door at the ceiling
ADD: Switch for ALL track light on inside of the desk nook
CHANGE: Move all cans toward the center, location as discussed with John
ADD/CHANGE: 4 LED cans per row instead of 3, use light in laundry as starting point
CHANGE: second can from the wall on the left side if you look to the mountain to be centered over the barn door entrance so that the two cans there will be in line with the can in the laundry room
CHANGE: The rows of cans should respectively be moved closer to the center of the room by approximately 6 inches VIF
ADD: Beauty blanket for ceiling fixture center of the room (use kitchen pendants as guide)
ADD: Switch beauty blanket to switches on wall with the sub panel

STORAGE CLOSET (ADDITION TO SCOPE - forgotten on plans, Anne's mistake)

ADD: 2 outlets, location discussed today with John
A/P: Choose light fixture (TBD)

LANDSCAPE LIGHTING

CHANGE: Do not have Landscape lighting switch in master
A/P: Discuss where to set up landscape lighting closer to kitchen

KITCHEN
VERIFY: Location of Switch for existing island lights
VERIFY: Location of Switch for existing kitchen cans
STAIRS

ADD: Stair tread/riser illuminating lights on the wall without railing (ADDITION TO SCOPE)
A/P: Choose small LED lights for stair risers (TBD)
A/P: CHOOSE between 2 CANS, TRACK OR SCONCES

SITTING ROOM

VERIFY: NO double hot outlets in sitting room (no switch powered outlets)
ADD: Track lights on 2 ridges and ridge of hallway
A/P: Choose track fixture (TBD)

MISC

DISCUSS: Placement of landline in kitchen, near microwave
DISCUSS: Door bell placement?
DISCUSS: Set up for future alarm system

QUESTIONS FOR ELECTRICIAN
  1. Can we run HDMI cables as well as coax cable up through the wall to the TVs? This will allow us to connect the 2 quart shallow cables together.
  2. How much would it cost to run the neutral wire to the outlet next to the kitchen door?
  3. Are the different track systems standardized so that different light fixtures will fit?
  4. DISCUSS: Using 2 circuit track lighting instead of just 1 track for flexibility
  5. In 2 circuit track do standard fixtures fit there and they just get adjusted or do you have to buy very special fixtures?
  6. Can you cut tracks to length if there longer than you need them?
  7. DISCUSS: Reattaching outdoor electrical outlets
  8. Is there anything you need to do differently to set up for going solar?

And there you have it.